Aloe Vera: Care, Watering and When to Cut a Leaf
Aloe vera care: how much light and water it needs, which pot and soil, how to propagate it from pups and how to extract its gel. The most useful succulent.
In this article
Aloe vera is the most practical succulent you can own: it looks great, shrugs off neglect, and its gel soothes burns and bites. I keep one on the kitchen windowsill precisely because it earns its spot — every cook ends up grabbing a hot pan sooner or later. It's genuinely easy to care for once you internalize one rule: it comes from arid country, so overwatering is its only serious enemy. Get the watering right and everything else is forgiving.
This guide covers the full picture — light, water, the right soil and pot, repotting, propagating from pups, harvesting and storing the gel, and a troubleshooting table for when something looks off. Let's dig in.
Meet the plant
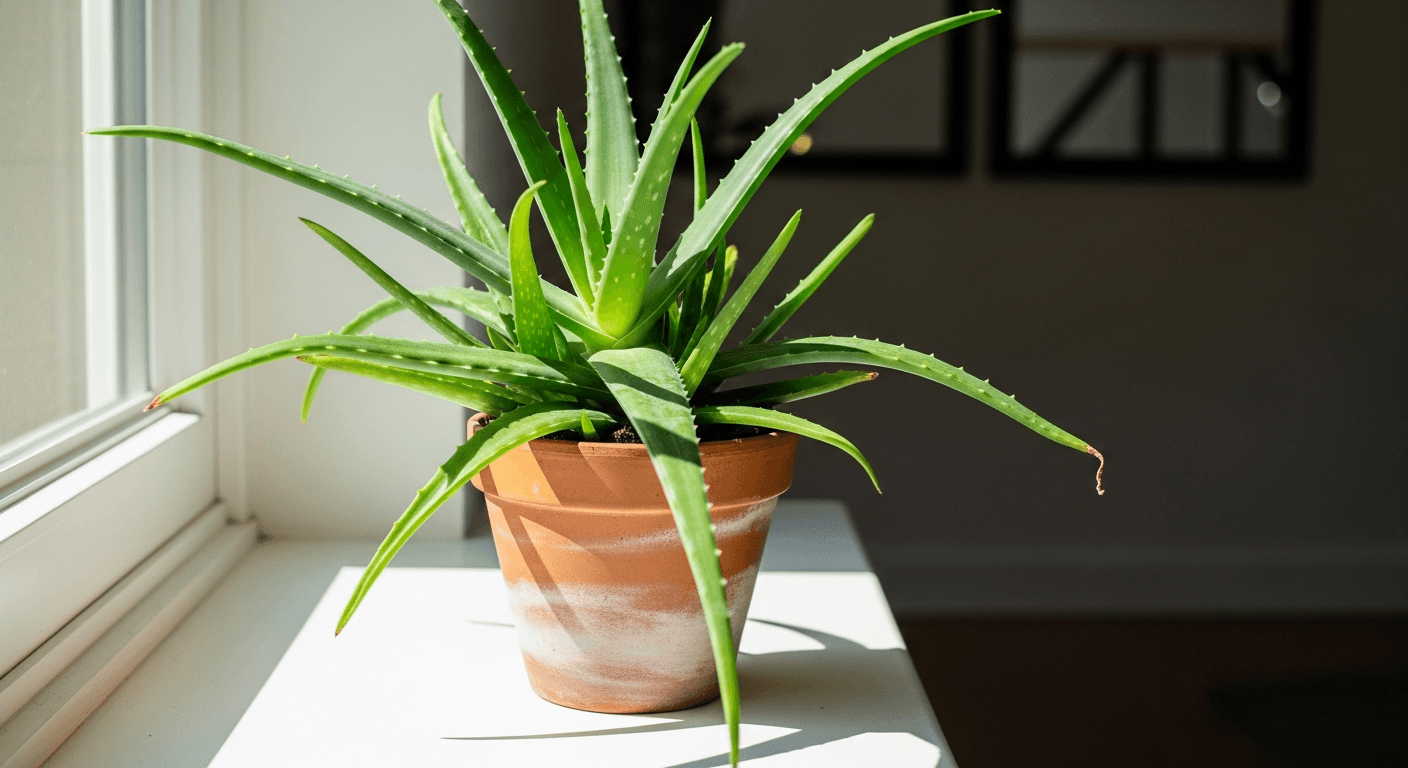
True aloe vera (Aloe barbadensis miller, also sold as Aloe vera) is a stemless or short-stemmed succulent that grows in a tight rosette of thick, fleshy, gray-green leaves edged with soft teeth. Those leaves are basically water tanks — the clear inner gel is the plant's drought reserve, which is exactly why it can go weeks without a drink. A happy, mature plant indoors reaches roughly 30-60 cm (12-24 in) across and will throw off baby plants (pups) around its base, so one aloe quickly becomes a small family.
A quick note on lookalikes: aloe is sometimes confused with agave, which has rigid, sharp-spined leaves and a very different growth habit. Aloe leaves are softer, juicier, and the teeth along the margin are flexible rather than dangerous.
Is your plant looking off and you are not sure why?
Free AI diagnosisBasic care, point by point
Light
Aloe wants lots of light — this is the single most common thing people get wrong after watering. Give it the brightest spot you have:
- Indoors: a south- or west-facing window (north in the Southern Hemisphere), ideally with a few hours of gentle direct sun. An east window works but growth will be slower.
- Outdoors: bright shade to morning sun is ideal. Full midday sun in high summer can scorch a plant that isn't used to it.
In low light, aloe stretches and goes pale: the rosette opens up flat, the leaves lose their plump upright posture and flop outward, and the color fades to a thin yellow-green. That stretching is called etiolation, and it doesn't reverse — new growth will be compact again once light improves, but the floppy leaves stay floppy. If yours is doing this, read up on why plants get leggy and move it closer to glass.
One useful tell: healthy aloe grown in strong light often takes on a slight bronze or reddish tinge at the leaf tips and edges. That mild blush is a sign of plenty of light, not stress — it only becomes a problem if leaves go crispy brown (see sunburn below). If you want to understand intensity versus duration for indoor spots, my notes on indoor plant light go deeper.
Watering
The whole game with aloe is water thoroughly, then wait until the soil is bone dry before watering again. Drench the pot until water runs from the drainage holes, let it drain fully, and then ignore it for a while. Frequent little sips are what rot roots; a deep soak followed by a real dry-out mimics desert rain.
Rough cadence (adjust to your home — pot size, heat and light all shift it):
| Season | Typical interval | What to check first |
|---|---|---|
| Spring/Summer (growing) | Every 2-3 weeks | Top 5 cm of soil fully dry |
| Autumn | Every 3-4 weeks | Soil dry all the way down |
| Winter (resting) | Every 4-6 weeks, sometimes less | Soil bone dry; pot feels light |
Treat those numbers as a starting point, not a schedule. The reliable method is to check, don't count: push a finger or a wooden skewer to the bottom of the pot. If it comes out with damp soil clinging to it, wait. Lifting the pot also works — a watered aloe is noticeably heavy, a thirsty one is surprisingly light.
How aloe tells you what it needs:
- Thirsty: leaves thin out, lose their plumpness and start to curl inward or pucker. This is the safe direction to err in — a thirsty aloe bounces back within a day of watering.
- Overwatered: leaves go soft, mushy, yellow or translucent, usually starting from the base. The plant may feel loose in the soil. This is the dangerous direction, and it's the one to take seriously.
In winter, when growth basically stops, less really is more. If you're unsure whether a limp leaf means too much or too little, the symptom guide on overwatering vs underwatering sorts it out quickly. A good habit when traveling: aloe is the one plant you can leave for two weeks without a second thought — see watering while you're away if you want to set the whole collection up before a trip.
Soil and pot
Drainage is everything. Use a gritty cactus and succulent mix — the kind that drains so fast water pours straight through. If your only option is regular potting soil, cut it heavily with perlite, pumice or coarse sand (roughly half and half) so it never stays soggy. My breakdown of potting soil covers what to mix in and why ordinary soil holds too much water for a desert plant.
For the pot:
- Terracotta beats plastic for aloe. Unglazed clay is porous, so it wicks moisture out of the soil and dries the rootball faster — a built-in safety margin against overwatering.
- Drainage holes are non-negotiable. No exceptions, no pebble-layer hacks at the bottom of a sealed pot.
- Skip the saucer of standing water. If you use a cache-pot, tip out anything that collects after watering.
- Size up modestly. Aloe likes to be a little snug. An oversized pot holds a big volume of slow-drying soil around a small root system, which is a recipe for rot. If you're choosing between sizes, my guide to choosing a pot walks through getting it right.
Repotting
Aloe is slow and unhurried, so it only needs repotting every 2-3 years, or sooner if it's outgrowing its pot or so crowded with pups that the rosette is being shoved out of shape. Spring is the best time.
- Let the soil dry first — a dry rootball comes apart cleanly and is gentler on the plant.
- Slide the plant out and shake or tease off the old soil.
- Inspect the roots. Healthy aloe roots are firm and pale. Trim any that are black, mushy or smell sour with clean scissors.
- Replant in fresh, dry cactus mix in a pot just one size larger.
- Wait about a week before the first watering. This lets any nicked roots callus over so they don't rot — watering immediately into damaged roots is how well-meaning repots go wrong.
How to propagate it (pups)
This is the fun part. A thriving aloe produces pups — little clones — around the base of the mother plant, and separating them is the easiest propagation in the houseplant world.
- Wait until a pup is a decent size (ideally 8-10 cm / 3-4 in tall) and has formed a few of its own roots. Bigger pups establish far more reliably than tiny ones.
- Unpot the whole plant so you can see where the pup attaches.
- Gently work the pup away from the mother. Aim to keep some roots on it; if it won't separate by hand, slice through the connecting tissue with a clean, sharp knife.
- Let the cut callus for 1-2 days in open air, out of direct sun. This dried scab is what prevents rot.
- Pot the pup in dry cactus mix and wait a week before watering, then resume the normal soak-and-dry routine.
Pups with no roots at all can still work — treat them like a cutting, callus the base, and pot it up — but expect a slower, less certain start. You can also grow aloe from a leaf cutting, but honestly it rarely succeeds; the leaf usually just rots before it roots. Pups are the dependable route. If you catch the propagation bug, the same callus-and-dry logic applies across the family — see the general guide to succulent care.
How to use its gel
The clear inner gel is the reason aloe lives in so many kitchens. Here's how I harvest it:
- Choose a mature outer leaf — the lowest, thickest ones — and cut it at the base with a clean knife. Always take from the outside; the inner leaves are the newest growth.
- Stand the cut leaf upright in a cup for about 10 minutes so the yellowish sap (latex) drains out of the cut end.
- Lay it flat, trim off the spiny edges, and slice the leaf open lengthwise.
- Scoop out the clear gel with a spoon, or peel the top skin back and lift the fillet out.
Avoid the yellow layer (aloin/latex) just under the green skin — it's bitter and irritating to skin and stomach. Rinsing the gel briefly helps remove any residue. Use the gel on minor burns, sunburn, scrapes, dry skin and insect bites; it's cooling and soothing on contact.
A word of caution: topical use on skin is the well-established, low-risk application. Eating raw aloe is a different matter — the latex is a harsh laxative, and only properly processed inner-leaf gel is considered food-safe. If you're thinking about consuming it, research it carefully first; this article is about growing and topical use, not a medical recommendation.
A single mature leaf yields plenty of gel and the plant heals over the cut within days, so you can harvest a leaf or two whenever you need without setting the plant back — as long as you don't strip it bare.
Common problems and fixes
Most aloe trouble traces back to water or light. This table is the quick diagnosis:
| Symptom | Likely cause | What to do |
|---|---|---|
| Soft, mushy, brown leaves at the base; plant loose in soil | Overwatering / root rot | Unpot, cut away rotten roots and leaves, repot in dry gritty mix, wait a week to water |
| Thin, curled, puckered leaves | Underwatering (or sometimes too little light) | Give a deep soak; if soil was already moist, move to brighter light instead |
| Flat, floppy rosette; pale, stretched growth | Not enough light (etiolation) | Move to the brightest window; growth corrects but stretched leaves stay |
| Brown, crispy patches or bleached spots | Sunburn from sudden intense sun | Move out of harsh midday sun; acclimate gradually next time |
| Brown, dry leaf tips | Underwatering, very dry air, or salt buildup | Soak thoroughly; flush the pot occasionally to clear fertilizer salts |
| Mushy spot on a single leaf | Localized rot or bruise | Cut the affected leaf off cleanly at the base |
| Tiny white cottony specks in leaf joints | Mealybugs | Dab with a cotton swab dipped in alcohol; see the mealybug guide |
Two of these deserve a deeper look. If the rot is advanced, the rescue steps in root rot can still save a plant that looks nearly gone — healthy tissue and a single rooted pup are often enough to start over. And if you moved it outside too fast, sunburn on plants explains how to harden it off so it doesn't happen again. The fix for sudden-sun scorch is always gradual acclimation, an hour or two more exposure each day over a week or two.
Pests are rare on aloe, but the occasional mealybug shows up as white cottony tufts where leaves meet the center. Wipe them out early with alcohol on a swab before they spread.
Is it toxic to pets?
Yes — and as someone with two cats, I take this one seriously. Aloe vera is toxic to dogs and cats if eaten: the latex and saponins it contains cause vomiting, diarrhea and lethargy. The clear gel is the least harmful part, but the whole leaf is best treated as off-limits. Keep your aloe well out of reach — a high shelf or a room the animals can't access — or skip it entirely if you have a determined plant-chewer. If you want genuinely cat-safe greenery instead, look at non-toxic options rather than risking it.
A plant that gives back
With strong light and sparse watering, aloe vera will outlast most of the trendier houseplants on your shelf, quietly multiplying into pups you can pot up or give away — and it'll bail you out of the odd kitchen burn along the way. Honestly, if you've killed succulents before, it was almost certainly the watering can; lean on the soak-and-dry rhythm and this one is hard to lose.
Not sure whether your aloe is thirsty or drowning, sunburned or just settling in? Snap a photo and run it through the AI diagnosis tool — it'll read the symptoms and point you to the fix.
Related articles
Indoor Cactus Care: How to Get Blooms (and Avoid Rot)
Indoor cactus care: how much light and water it needs, which soil, the winter rest that triggers flowering, and the mistakes that rot it. Easy and tough.
Succulents: Care So They Don't Stretch or Rot
Succulent care: how much light and water they need, which soil and pot, how to propagate from leaves, and why they stretch. The guide to keep them pretty.
Jade Plant (Crassula ovata): Care Guide
How to care for the jade plant (Crassula ovata): lots of light, soak-and-dry watering, succulent soil, easy leaf and stem propagation, and toxicity to pets.
Trouble with your plant?
AI diagnosis